
DIY PICK UP BOX
- Rebecca
- Feb 13
- 4 min read
Hello Y'all!
This post is mainly for my fellow small business owners and the DIYers! Every time I share my Pick-Up box on social media, I have fellow small business owners asking about where I got it and how it works, and I will write a blog post with details. Well, this one is for you!
Where did I get the box?
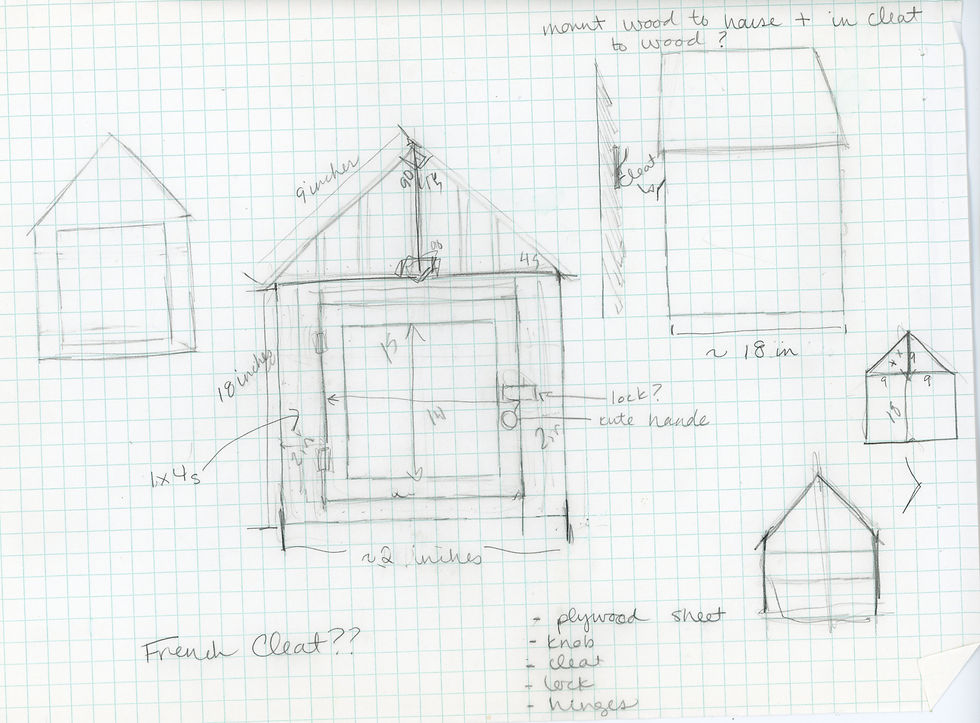
The first question is easy to answer, I made it! And by "I", I mean my husband and I but it was my brainchild so I will take credit for the design. But let's backtrack to why we made the box before I explain how we made it.
In January of 2024, I closed my local booth space which had served as a pickup location and a great option for locals to grab a quick. When I started planning the transition to fully online I knew I wanted to provide an easy way for my local customers to shop without having to purchase shipping and keep delivery at a manageable distance for myself. Looking at the stats, I have a growing customer base around the Pee Dee and not just in Hartsville. If you are reading this outside of South Carolina, please note some of what I would consider "local" customers live closer to 45 minutes away. Driving all of the Pee Dee just wouldn't be manageable, I do however, have a delivery option for the 29550 zipcode. (I have been known to drive for hours around the Pee Dee to make deliveries outside of the current delivery zone to make sure Christmas orders arrive on time.) So, I started thinking about a porch pickup option. I went to Pinterest, and good old Google but couldn't find something that met my requirements for the perfect Rebecca Powell Pick-Up Box.
The requirements:
Contactless - To make it an easy pickup process for myself and customers I wanted there to be a way for them to pick up their orders without having to schedule a time, deal with barking pups, and any other headaches that could arise. I wanted it to be grab-and-go.
Secure - Living within city limits anywhere has its benefits and downsides. I wanted to make sure orders were grab-and-go for only the individuals that purchased them.
Weather safe - Thunderstorms and humidity were not the nicest to paper and watercolor paintings. So I wanted to make sure it was weather-sealed.
Under $200 - This business runs debt-free and I do my best to spend the least money possible while balancing quality.
Match aesthetically - I wanted the box to be not just a box but an extension of my brand.
So with those requirements in mind, I searched the internet for options, some to purchase and some to make. But nothing checked off every box. But while scrolling Pinterest I came across the mini libraries. And that inspired me enough to start sketching a design for my husband.
How We Made It
It truly was a build-and-figure-it-out-as-you-go kind of project so I do not have a step-by-step tutorial but here are the details:
The structure is like a gingerbread house. The base is square with two rectangular sides. Then the back has a roof pitch and the front has the same pitch but also the opening for the door. The roof was scrap wormy maple my dad had from a project.
The details on the door, and the board and batten sides give the box the character I was envisioning. And we just used some trim pieces to create those details. Once the box was built I used wood putty to fill in the holes and gaps before prepping for paint. During this time I also used caulking to fill in gaps where the roof met the sides as step one for weatherproofing.
After sanding the rough edges, and putty I used an exterior/interior paint and primer. I painted the outside and the inside of the box, the front & back of the door, and stained the roof. Once everything was dry I added a vinyl peel-and-stick wallpaper I found on Amazon to the inside of the box. This added another layer of protection, as well as, adding to the pickup vibes.
The final weather-proofing elements are the metal pieces (not sure what they are called but I found them in the roofing section at Lowes) where the roof meets at the top and weather sealing around the edge of the door (You can find it in the screen door/window section of Lowes).
The last thing was to add the lock. I wanted a lock so I could easily change the code and have the code something easy to share with customers (I will share more about this when I chat about how the box works). I selected a 4 letter turn lock. And so far so good.
To attach the box we used a French cleat, which is now my favorite hanging option for hefty items.


If you stumbled upon this blog post and wanted a step-by-step tutorial I do apologize, we were making it up as we went and I never thought it would bring about as much interest as it has. If you have questions please send them my way and I can answer them to the best of my ability.
How does Pick-Up work?
Rebecca you said it's contactless, how does that work? Well, let me tell you! I had to do some back-end work on my website to make it as automatic as possible but the about hour of work was well worth it. When someone selects Studio Pick-Up at check out they will receive two emails, one with their order confirmation and a second email with pickup instructions. The pickup instructions will have the lock code, parking information, and any information that may be helpful. Once the order is placed in the Pick-Up Box a third email is sent that notifies the customer that their order is ready for them.
With my email provider, there has been an issue of emails going to junk mail a handful of times so I keep an eye on what is in the box and if hasn't been picked up in a couple of days I reach out and resend the information. But again I can count on one hand how many times I have had to deal with that issue.
After a year of use the Pick-Up Box is still going strong!

Comentários